Using TriggerMesh with Tanzu Application Platform
VMware Tanzu Application Platform is a packaged set of components that helps developers and operators to more easily build, deploy, and manage apps on a Kubernetes platform. Since version 1.5, Tanzu Application Platform includes eventing sources for AWS, Azure and Google Cloud Platform developed by TriggerMesh.
In this guide you will deploy Tanzu Application Platform on a Google Kubernetes Engine (GKE) cluster, followed by creating a Knative eventing pipeline utilizing the TriggerMesh event sources packaged with Tanzu Application Platform.
Please note that this guide contains a subset of Tanzu Application Platform installation information documented in official installation guide and is not intended to be a replacement for the official documentation.
Create the GKE Cluster
Refer to the resource requirements section for a better understanding of Tanzu Application Platform cluster requirements.
Begin by setting up a GKE cluster with sufficient cluster resources for deploying Tanzu Application Platform:
After the cluster has been created, the Kubernetes context is automatically updated so that kubectl can interact with the newly created cluster.
Install Tanzu Application Platform
Prerequisites
To install Tanzu Application Platform you need a VMWare Tanzu Network account to download the container images as well as other tools required in the installation process. You will also need a Docker registry with read and write access. You can use any registry of your choice such as Docker Hub, GCR and so on. Additionally you will also need to set up a wildcard DNS record at your Domain registrar, make sure you have the required access.
Sign in to your VMWare Tanzu Network account and accept the EULA's for Tanzu Application Platform and Cluster Essentials for Tanzu. After accepting the EULA's, install the Tanzu CLI and plugins package as described here followed by installing the Cluster Essentials for VMware Tanzu package for your platform using these instructions.
Deploy the Cluster Essentials
After completing the prequisites, deploy the VMWare Cluster Essentials to the Kubernetes cluster using the following commands.
export INSTALL_BUNDLE=registry.tanzu.vmware.com/tanzu-cluster-essentials/cluster-essentials-bundle@sha256:c7b0988cf3e982625287b241db5d78c30780886dfe9ada01559bb5cd341e6181
export INSTALL_REGISTRY_HOSTNAME=registry.tanzu.vmware.com
export INSTALL_REGISTRY_USERNAME=TANZU-NET-USER
export INSTALL_REGISTRY_PASSWORD=TANZU-NET-PASSWORD
cd $HOME/tanzu-cluster-essentials
./install.sh --yes
Remember to update TANZU-NET-USER and TANZU-NET-PASSWORD with your VMWare Tanzu Network credentials.
Install Tanzu Application Platform package
Set up the following environment variables:
export IMGPKG_REGISTRY_HOSTNAME_0=registry.tanzu.vmware.com
export IMGPKG_REGISTRY_USERNAME_0=TANZU-NET-USER
export IMGPKG_REGISTRY_PASSWORD_0=TANZU-NET-PASSWORD
export IMGPKG_REGISTRY_HOSTNAME_1=MY-REGISTRY
export IMGPKG_REGISTRY_USERNAME_1=MY-REGISTRY-USER
export IMGPKG_REGISTRY_PASSWORD_1=MY-REGISTRY-PASSWORD
export INSTALL_REGISTRY_HOSTNAME=MY-REGISTRY
export INSTALL_REGISTRY_USERNAME=MY-REGISTRY-USER
export INSTALL_REGISTRY_PASSWORD=MY-REGISTRY-PASSWORD
export TAP_VERSION=1.5.1
export INSTALL_REPO=TARGET-REPOSITORY
TANZU-NET-USERandTANZU-NET-PASSWORDare the VMWare Tanzu Network account credentialsMY-REGISTRYis your container registry location, fe.gcr.ioMY-REGISTRY-USERandMY-REGISTRY-PASSWORDare the registry credentialsTARGET-REPOSITORYis the target repository onMY-REGISTRY, fe.project/tanzu
If you are using the Google Container Registry, the value of IMGPKG_REGISTRY_HOSTNAME_1 should be _json_key and the value of IMGPKG_REGISTRY_PASSWORD_1 would be the content of the JSON key file.
In the next step, you will be relocating the Tanzu Container images to your container image registry:
imgpkg copy \
  --bundle registry.tanzu.vmware.com/tanzu-application-platform/tap-packages:${TAP_VERSION} \
  --to-repo ${INSTALL_REGISTRY_HOSTNAME}/${INSTALL_REPO}/tap-packages
After the container images have been relocated to your image registry, create a namespace named tap-install:
Create a secret named tap-registry with the access credentials to the registry with the Tanzu container images:
tanzu secret registry add tap-registry \
  --server   ${INSTALL_REGISTRY_HOSTNAME} \
  --username ${INSTALL_REGISTRY_USERNAME} \
  --password ${INSTALL_REGISTRY_PASSWORD} \
  --namespace tap-install \
  --export-to-all-namespaces \
  --yes
Create another secret named registry-credentials with access credentials to internal registry:
tanzu secret registry add registry-credentials \
  --server   ${INSTALL_REGISTRY_HOSTNAME} \
  --username ${INSTALL_REGISTRY_USERNAME} \
  --password ${INSTALL_REGISTRY_PASSWORD} \
  --namespace tap-install \
  --export-to-all-namespaces \
  --yes
Add the Tanzu Application Platform package repository to the cluster:
tanzu package repository add tanzu-tap-repository \
  --url ${INSTALL_REGISTRY_HOSTNAME}/${INSTALL_REPO}/tap-packages:$TAP_VERSION \
  --namespace tap-install
The Tanzu Application Platform profile provided below has the minimum configuration required to deploy Tanzu Application Platform. Refer to the Full Profile sample to understand and configure the parameters as per your needs.
Create a file named tap-values.yaml with the following content:
shared:
  ingress_domain: "INGRESS-DOMAIN"

  image_registry:
    project_path: "SERVER-NAME/REPO-NAME"
    secret:
      name: "registry-credentials"
      namespace: "tap-install"

kubernetes_version: "K8S-VERSION"

ceip_policy_disclosed: true
profile: full
INGRESS-DOMAINis the ingress hostname (fe.tanzu.example.com) that points at the external IP address of thetanzu-shared-ingressservice. You will be creating the DNS record after completing the installation.K8S-VERSIONis the Kubernetes version in use, fe.1.25.8.SERVER-NAME/REPO-NAMEis the target repository on your registry, fe.project/tanzu.
You can now deploy the Tanzu Application Platform package to the cluster with:
tanzu package install tap -p tap.tanzu.vmware.com -v ${TAP_VERSION} \
  --values-file tap-values.yaml -n tap-install
Please be patient while the Tanzu Application Platform package is being deployed. The command may return with a Reconcile failed message, however remain patient it could take more than 45 minutes for the reconciliation to succeed.
Execute the following command to check the status of the package:
tanzu package installed get tap -n tap-install
NAMESPACE:          tap-install
NAME:               tap
PACKAGE-NAME:       tap.tanzu.vmware.com
PACKAGE-VERSION:    1.5.1
STATUS:             Reconcile succeeded
CONDITIONS:         - type: ReconcileSucceeded
  status: "True"
  reason: ""
  message: ""
Retrieve this External IP address of the envoy service that the shared tanzu-system-ingress uses:
kubectl -n tanzu-system-ingress get svc envoy
NAME    TYPE           CLUSTER-IP    EXTERNAL-IP     PORT(S)                      AGE
envoy   LoadBalancer   10.52.12.49   34.83.226.138   80:32262/TCP,443:31059/TCP   101m
Finally, you need to set up a wildcard DNS record (fe. *.tanzu.example.com) for the INGRESS-DOMAIN configured in tap-values.yaml that points to the external IP address of the envoy service.
Deploy TriggerMesh Sources
TriggerMesh eventing sources for AWS, Azure and Google Cloud Platform are bundled with Tanzu Application Platform.
Use the following command to confirm that the triggermesh-controller is running:
kubectl -n triggermesh get deploy
NAME                     READY   UP-TO-DATE   AVAILABLE   AGE
triggermesh-controller   1/1     1            1           69m
To see the TriggerMesh sources in action, you would be creating knative eventing pipeline similar to the one described in the TriggerMesh Multicloud object storage notifications blog post.
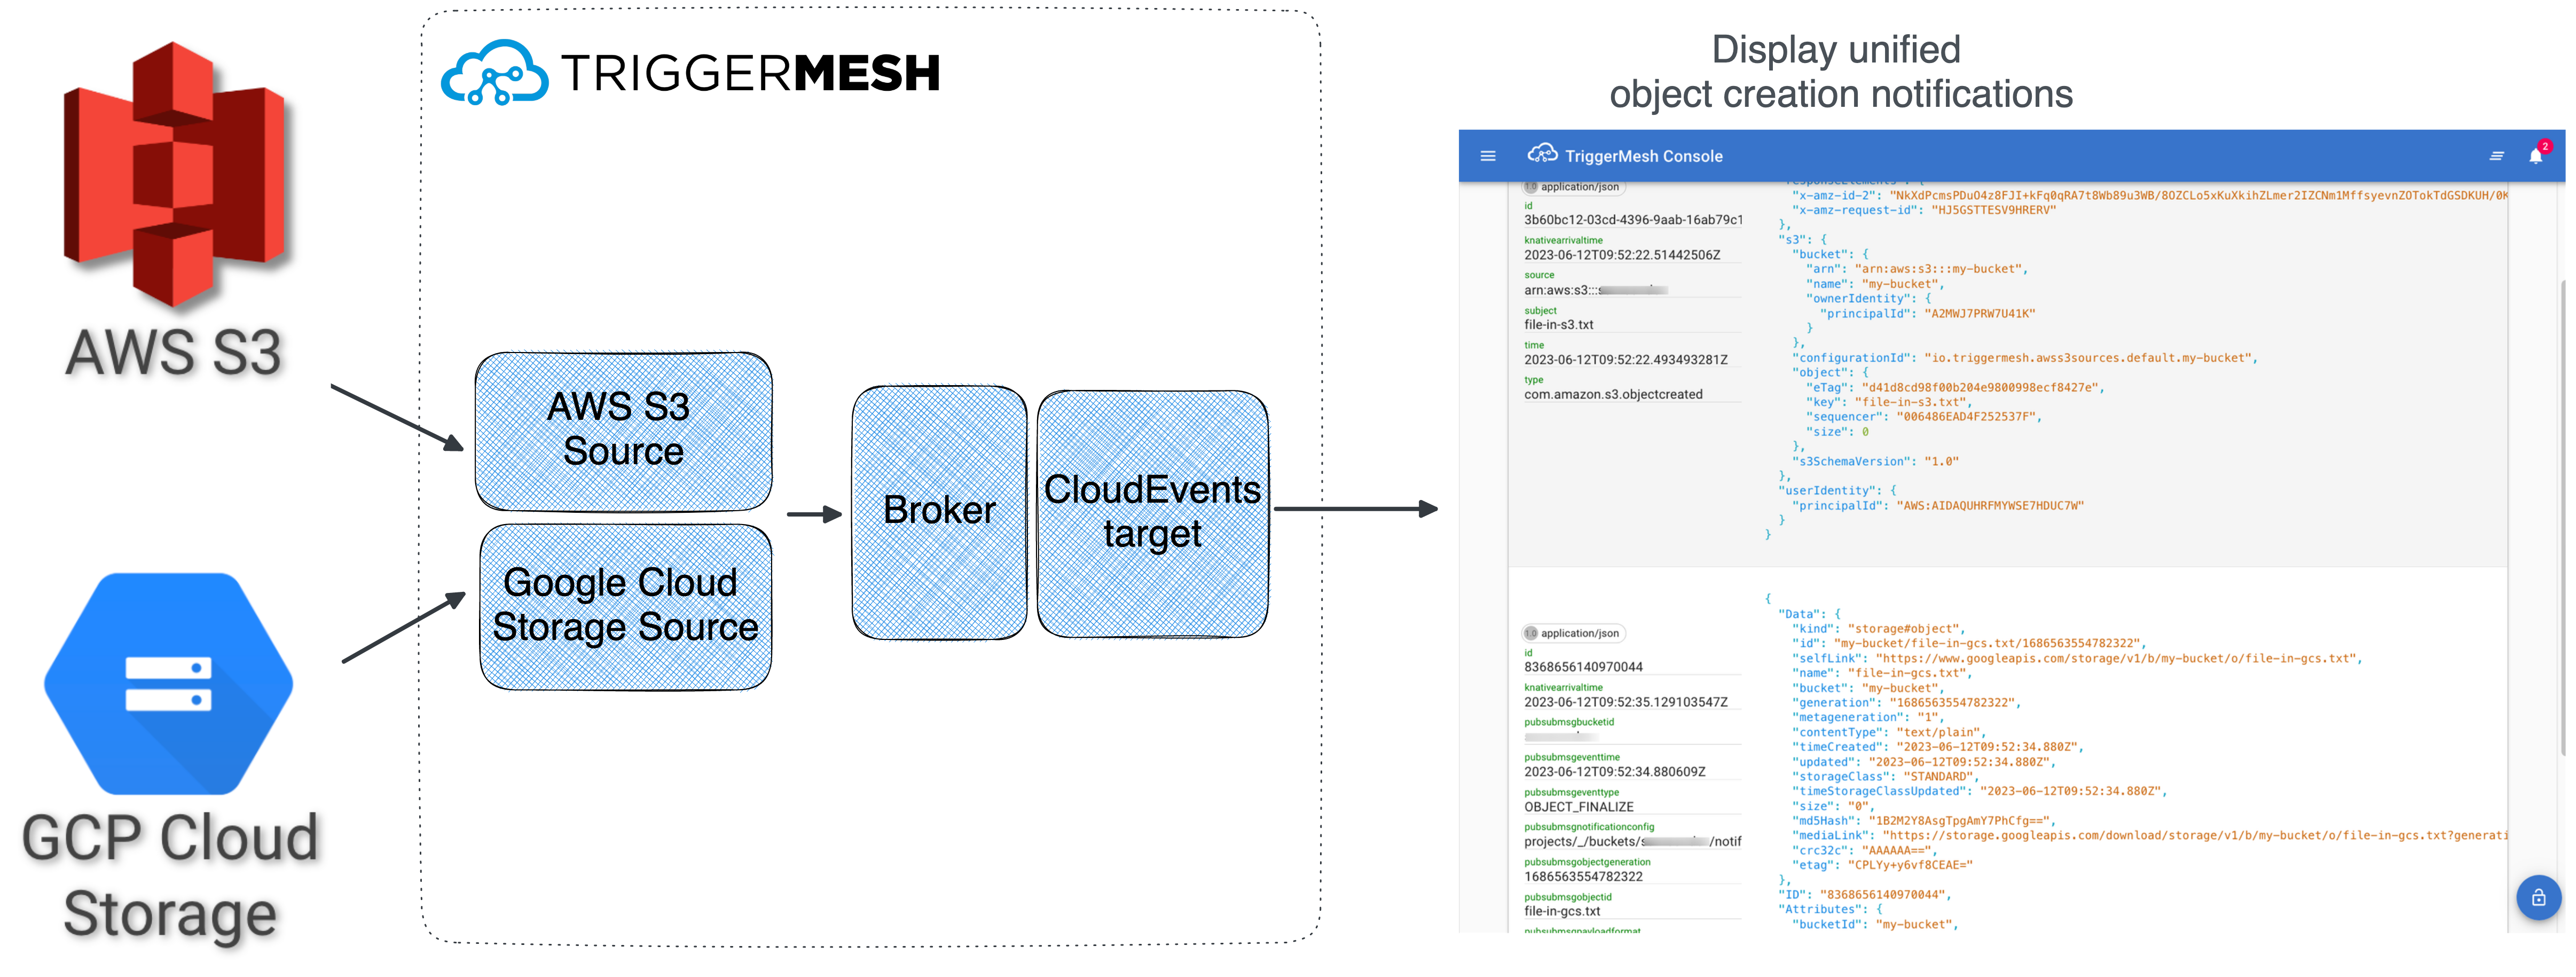
In essence, you are going to:
- Create the
Broker - Create the
AWSS3Source - Create the
GoogleCloudStorageSource - Deliver unified events to an event display
Service
Create a Broker
Create a file named broker.yaml containing the manifest for creating a Broker as shown below:
Deploy the broker using the command:
Verify that a broker named default is successfully created:
kubectl get broker default
NAME      URL                                                                        AGE   READY   REASON
default   http://broker-ingress.knative-eventing.svc.cluster.local/default/default   13s   True
Create the AWSS3Source
To create a AWSS3Source, the prerequisites are:
- an AWS IAM access key to authenticate with S3
- an AWS S3 bucket
ARN
Once you have those, create a Secret named awscreds containing the AWS credentials:
kubectl create secret generic awscreds \
  --from-literal=aws_access_key_id=AWS_ACCESS_KEY_ID \
  --from-literal=aws_secret_access_key=AWS_SECRET_ACCESS_KEY
AWS_ACCESS_KEY_IDandAWS_SECRET_ACCESS_KEYare the AWS credentials
Next, create a file named awss3source.yaml containing the manifest to create the AWSS3Source object:
apiVersion: sources.triggermesh.io/v1alpha1
kind: AWSS3Source
metadata:
  name: my-bucket
spec:
  arn: AWS_S3_BUCKET_ARN

  eventTypes:
  - s3:ObjectCreated:*
  - s3:ObjectRemoved:*

  auth:
    credentials:
      accessKeyID:
        valueFromSecret:
          name: awscreds
          key: aws_access_key_id
      secretAccessKey:
        valueFromSecret:
          name: awscreds
          key: aws_secret_access_key

  sink:
    ref:
      apiVersion: eventing.knative.dev/v1
      kind: Broker
      name: default
AWS_S3_BUCKET_ARNis the ARN of the S3 bucket
Deploy the AWSS3Source object:
Verify that the object is created successfully:
kubectl get awss3source my-bucket
NAME        READY   REASON   QUEUE                                                    SINK                                                                       AGE
my-bucket   True             arn:aws:sqs:eu-west-1:012345678901:s3-events_my-bucket   http://broker-ingress.knative-eventing.svc.cluster.local/default/default   14s
Create the GoogleCloudStorageSource
To use the GoogleCloudStorageSource, start by following the steps below to configure the necessary resources and permissions. This is a simplified but overly permissive approach, there are ways in which you can be more restrictive.
- Create a service account with the Pub/Sub Editor and Storage Admin permissions
- Create a new
JSONkey file for the service account and save it asserviceaccount.json - Create a Google Cloud Storage bucket
- Copy the Cloud Storage Service Account name from the bucket settings page and grant it the Pub/Sub Publisher permission from the IAM console
Create a file named googlecloudstoragesource.yaml containing the manifest to create the GoogleCloudStorageSource object:
apiVersion: sources.triggermesh.io/v1alpha1
kind: GoogleCloudStorageSource
metadata:
  name: my-bucket
spec:
  bucket: MY-BUCKET

  pubsub:
    project: MY-PROJECT

  eventTypes:
  - OBJECT_FINALIZE
  - OBJECT_DELETE

  serviceAccountKey:
    value: >-
      {
        "type": "service_account",
        "project_id": "triggermesh",
        ...
        ...
        "universe_domain": "googleapis.com"
      }

  sink:
    ref:
      apiVersion: eventing.knative.dev/v1
      kind: Broker
      name: default
MY-BUCKETis the name of the Google Cloud Storage bucketMY-PROJECTis the Google Cloud Project Identifierspec.serviceAccountKey.valueis the content of theserviceaccount.jsonfile
Deploy the GoogleCloudStorageSource object using the command:
Verify that the GoogleCloudStorageSource object was created successfully:
kubectl get googlecloudstoragesource my-bucket
NAME        READY   REASON   SINK                                                                       AGE
my-bucket   True             http://broker-ingress.knative-eventing.svc.cluster.local/default/default   10s
Create the Event Viewer
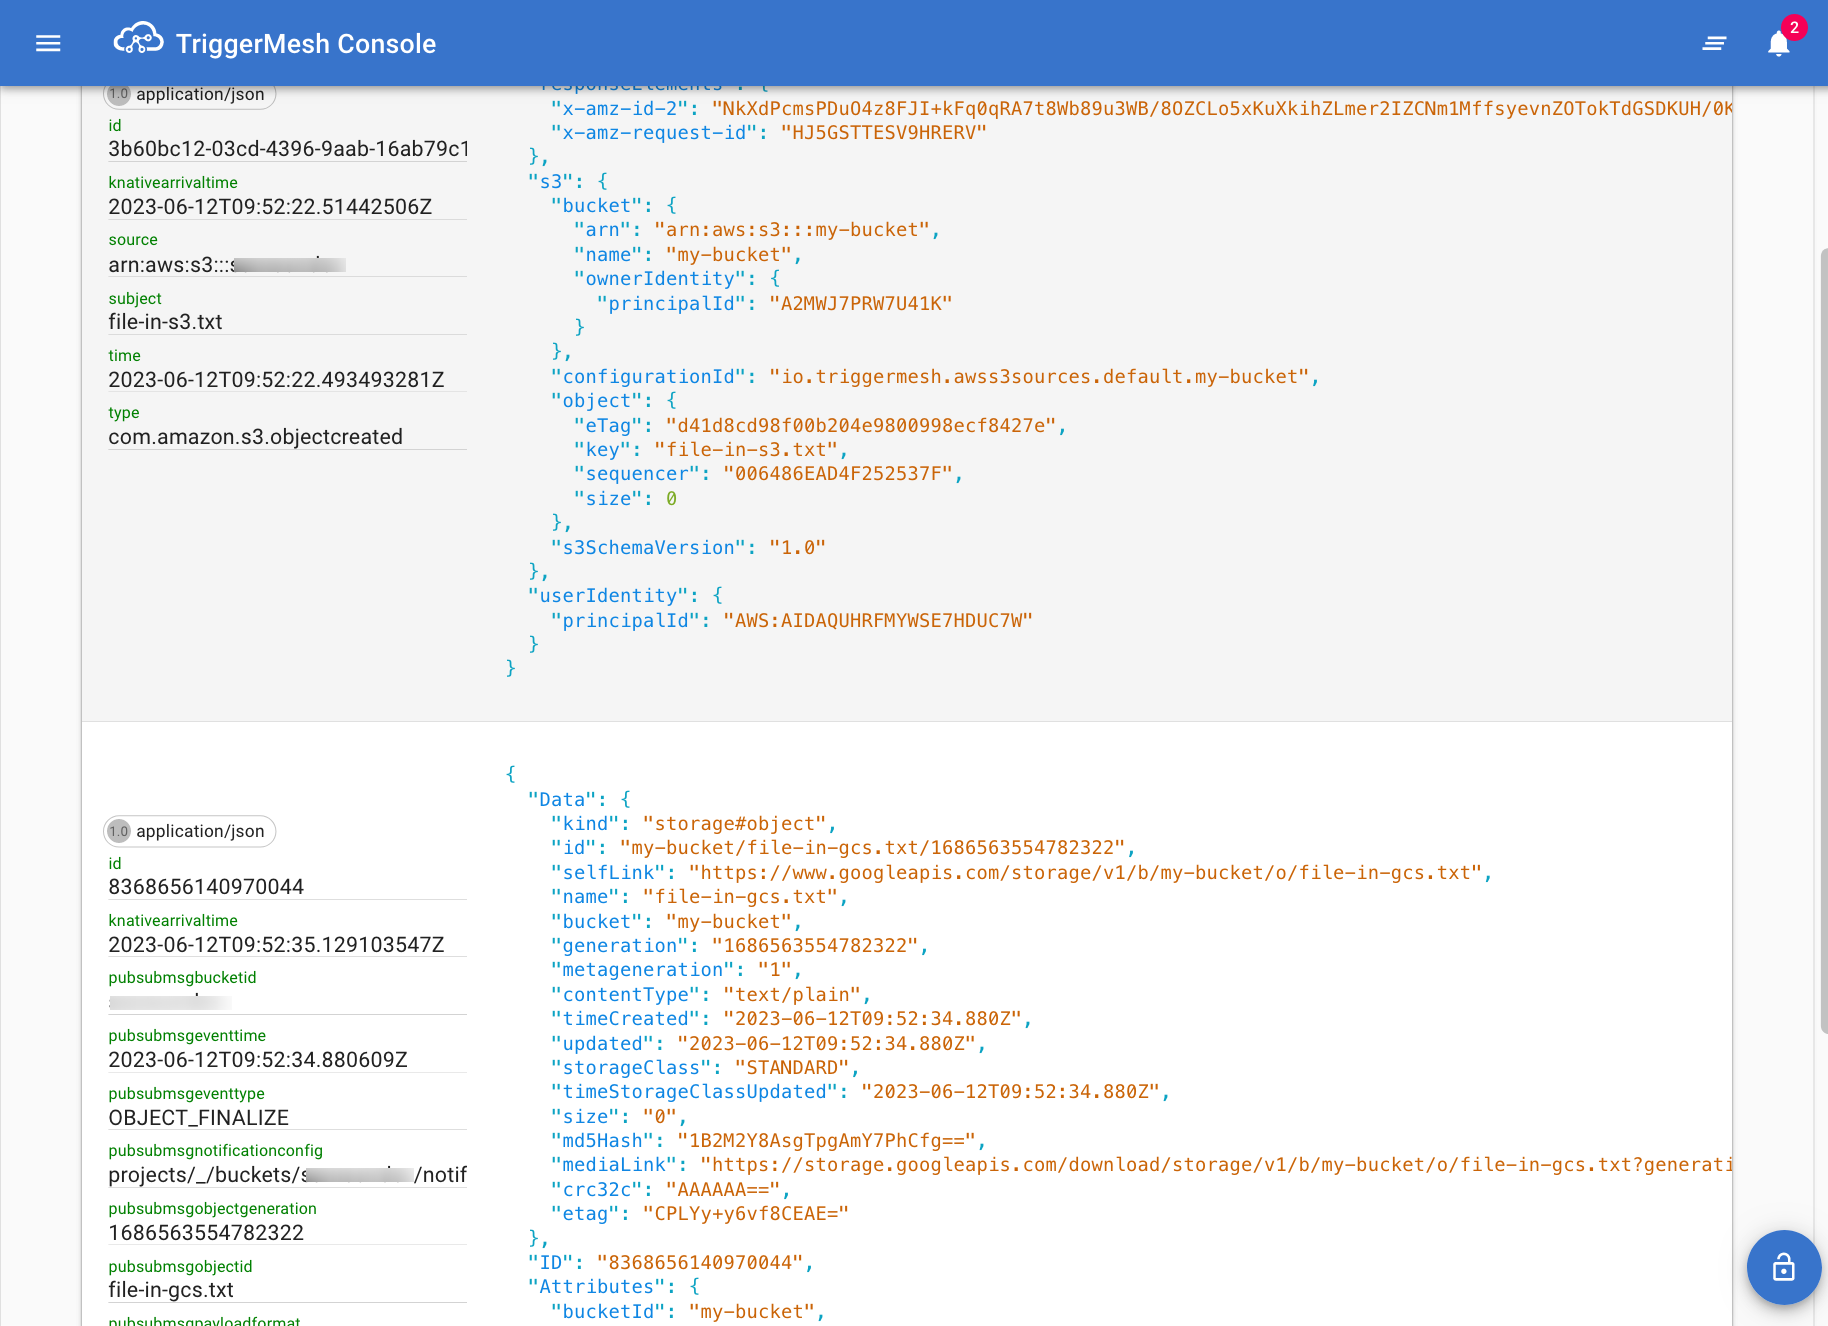
TriggerMesh console is a simple event viewer service that displays events in a web-based console:
Create a file named event-viewer,yaml containing the manifest to deploy the TriggerMesh console:
apiVersion: serving.knative.dev/v1
kind: Service
metadata:
  name: event-viewer
spec:
  template:
    spec:
      containers:
        - image: gcr.io/triggermesh/triggermesh-console:v0.0.1
Deploy the event viewer using the command:
Verify that the Service was created successfully:
kubectl get ksvc event-viewer
NAME           URL                                              LATESTCREATED        LATESTREADY          READY   REASON
event-viewer   https://event-viewer.default.tanzu.example.com   event-viewer-00001   event-viewer-00001   True
Finally, set up a Trigger to send events received by the Broker to the event-viewer:
apiVersion: eventing.knative.dev/v1
kind: Trigger
metadata:
  name: default
spec:
  broker: default
  subscriber:
    ref:
      apiVersion: serving.knative.dev/v1
      kind: Service
      name: event-viewer
Deploy the Trigger object:
Verify that the Trigger was created successfully:
kubectl get trigger default
NAME      BROKER    SUBSCRIBER_URI                                  AGE   READY   REASON
default   default   http://event-viewer.default.svc.cluster.local   36s   True
Test it out!
Get the URL of the event-viewer service using the following command and open it in your web browser:
kubectl get ksvc event-viewer -o jsonpath={.status.url}
https://event-viewer.default.tanzu.example.com
Create new objects in S3 and GCS, and witness the beauty your new unified event stream 🙂.